Build a test-suite (AppVeyor)
Using AppVeyor, it’s possible to build your test-suite based on your genbiL file and other supporting files. This create a world of opportunity in terms of versioning of your test-suites.
In the following step-by-step example, we’ll connect to a directory at GitHub and build the test-suite defined in a file named dictionary.genbiL using the latest release of Genbi.exe available on GitHub releases.
The repository containing the fake test-suite is available on GitHub and the build project is available on AppVeyor.
Setting up a new project on AppVeyor
We assume that you already have an account at AppVeyor, if it’s not the case many tutorials to create an account are available online.
Once you’re connected to your AppVeyor account or organization, create a new project. In this case, we’ll name it NBi.Cicd.Build and link it to the GitHub repository containing the genbiL file and other supporting files (.csv, .nbitt, .nbitx or .nbivar).
At the opposite of Azure Pipelines, the user interface of AppVeyor won’t let you create the build script. To create this build process, you’ll have to move to the YAML file. Add a new file to your GitHub account named appveyor.yml, this file will contain the build process.
At the beginning of the file, set the build counter format and the image to use during the build. For the image you can use any windows based image.
version: build.{build}

image: Visual Studio 2019
Download and install genbi.exe
To download genbi.exe, the considerations explained on the page Build a test-suite (Azure DevOps) are also valid when using AppVeyor and the script is mostly the same.
You need to create a step build script in your AppVeyor YAML file.
build_script:

- ps: >-
The following PowerShell script is doing the job and can be added to the YAML file.
    $latestRelease = Invoke-WebRequest https://api.github.com/repos/seddryck/nbi/releases/latest -Headers @{"Accept"="application/json"}
    $json = $latestRelease.Content | ConvertFrom-Json
    write-host 'latest version:' $json.tag_name
    $url = $json.assets | ? { $_.Name -Match "Genbi" }  | % browser_download_url
    write-host 'url:' $url
    $zipfilePath = 'C:\Projects\genbi.zip'
    write-host 'destination:' $zipfilePath
    Invoke-WebRequest -Uri $url -OutFile $zipfilePath
Once downloaded, you’ll have to unzip it. AppVeyor has a version of 7-zip already installed and available in the PATH. Following lines of code should unzip the download and install it.
& 7z x "-o$($destinationUnzipPath)" $zipfilePath -r ;Run genbi.exe
We’ll switch to a CMD script to run genbi.exe.
- cmd: >-The content of the script is straightforward and can be added to the YAML file.
    echo 'building test-suite ...'
    "C:\projects\Genbi\Genbi.exe" "dictionary.genbil" -q
    echo 'test-suite built.'
Promote the output as artifact
Now that the test-suite has been created, we’ll need to promote it as an artifact. AppVeyor has a step in its build process to achieve this.
artifacts:
- path: '*.nbits'
  name: Test-suite
Trigger the AppVeyor build
Once the AppVeyor build defined, don’t forget to add it to your GitHub project. Due to the check-in in this repository, it will also trigger the pipeline on AppVeyor.
If later you update any file in this directory, it will also trigger the pipeline.
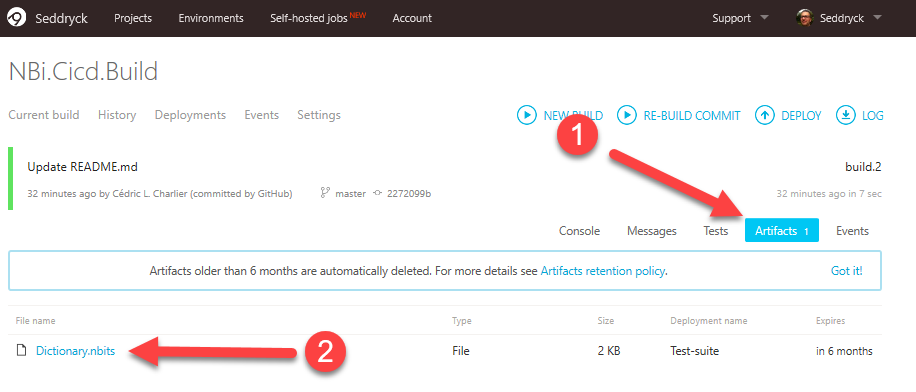
Download artifact
Once the AppVeyor build has completed, the artifact is available and can be downloaded or consummed by another build. Due to AppVeyor retention of the artifacts, this artifact will be deleted 6 months after its creation.
The full script of the AppVeyor build is available on GitHub and the result of this build project is also visible on AppVeyor.